Ordering Information
and Contact

Marie & Andrew Gussmann
PO Box 1995, Browning, MT 59417-1995
phone: 406-450-5876
mail: beadmatchbeads@gmail.com

More info


You are here: Home / Materials / Paint Cookies

Parfleche Painting Cookies in Old Natural Mineral Pigments and Trade Pigment Colors

Parfleche painting cookies made the old way with natural, trade pigments, and natural hide glue. These cookies have high concentrations of pigments and have taken us years to develop and perfect. We prefer to use them on a freshly fleshed hide that is strung in a frame and is still wet/damp. The cookies are 1 1/2 inch to 2 inches in diameter and one cookie will paint a phenomenal amount of parfleche. One of the top 5 restoration/artists in the U.S. complimented us on parfleche that we had completed with the cookies and said the parfleche were the closest thing to an old painted piece they had seen.


Parfleche painting cookies are now available for purchase

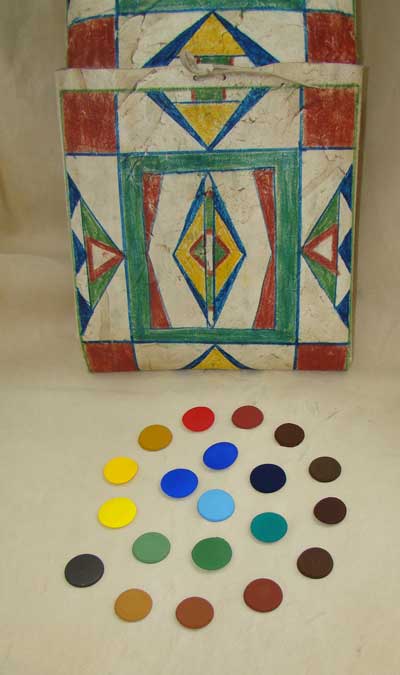
Here is a photo of the parfleche painting cookies illustrating the nice array of 20 different shades and colors. We have used the very best pigments that are perfect matches to what was available from 1840 through 1910 or so. Our cookies contain more premium pigments then are found in a 14 ml tube of the most expensive water colors paint tubes available today. One cookie will go a long way painting on wet/damp parfleche/rawhide. They are fun to use and are manipulated just as parfleche painting with cookis was done in the old days by hand. (We will send a how to print out with each cookie order).

It is of note that the cookie form for painting parfleche/rawhide has not been readily available either in this or most of the last century. So we are happy to be able to provide access to this wonderful nearly lost form of applying media.

Because these parfleche painting cookies are slightly concave and will hold enough water droplets, these cookies can also be used with either the bone brush of antiquity or regular artists paint brushes. Stiff brushes of various widths work great. We prefer using only the cookie for most of our work though. On some American Indian parfleches or parfleche bags, it is obvious that a free hand was used to paint them. On others, notably the transmontane style (Nez Perce, Wallawalla, Yakama, Shoshone, Crow and other Plains and Plateau tribes) at times used a straight edge when applying outlines on their parfleche pieces. Very early Crow Indian parfleches depict zoomorphic (animal) and anthropomorphic (human) designs. Usually these old Crow Indian parfelche cases are outlined in black or dark brown, with a back ground of an old red, with the animal or man design painted in the same deep brown/black that the outline had been painted with. On the Plateau and a few other places (Crow, Sioux parfleche) there also exists the rare and beautiful floral parfleche, which were undoubtedly done with a free hand and cookie! These cookies can be scored and broken into various size "brushes" for painting different width outlines or lines, and also for wider strokes in fill in areas. The cookie can be scored and broken into a half moon shape for fill in work and a long triangular shape for out lines. The third piece from this "scoring and breaking" effort will be a smaller half moon shape for filing to appropriate widths for fill in or other wider outline or line work. The possibilities are endless. There will be a diagram or photo of this to follow.


Parfleche Painting Cookies in Old Natural Mineral Pigments and Trade Pigment Colors

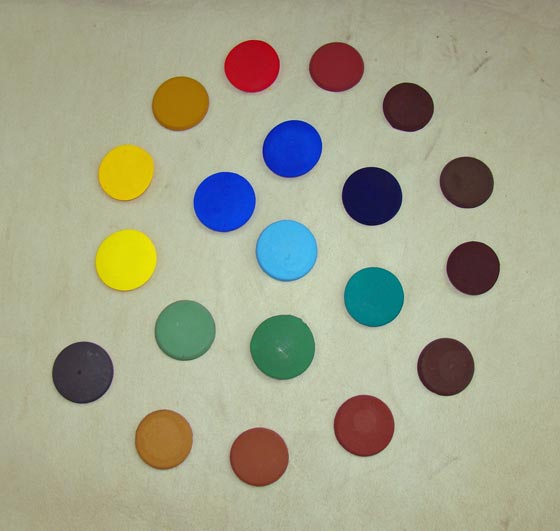
The cookies will be discussed starting with the light blue in the center of the spiral and then clockwise, working out to the end cookies in the spiral which is a dark grey/black. Each cookie blurb will also be keyed with the code used with each cookie in the next photo below.

Cookie B-1 Starting from the center of the spiral is a nice light blue found on Transmontane parfleche such as used by the Nez Perce, Shoshone, Crow, Bannock, Cayuse, Walla Walla, Klickitat, and other tribes from the Rocky Mountain Front, Plateau ans Great Basin areas. This light blue is also found elsewhere on the Great Plains. Most often used in small fill areas. I have seen it on rawhide bonnet cases more often than elsewhere.

B-2 The next marine blue is found throughout the Great Plains, Plateau, South West, and Southern Plains and other hide, rawhide and parfleche work. Used as major color fills, outlines and detail work on many pieces.

B-3 The next marine blue has more of a slight reddish tint to the blue, nearly not discernable but used as widely as the marine blue above in the same context.

B-4 The next blue is a dark blue found on many pieces throughout North America and goes back further into antiquity as a trade pigment then the blues noted above, again used as outlines and for detail work, as well as to paint large areas on parfleche, rawhide and hide pieces.

G-1 A nice light green the color known as pond scum green in the literature, used as a rare outline color on transmontane parfleche work, as well as fill in for larger areas.

G-2 A very common rich green seen on parfleche/rawhide from all areas.

G-3 Another trade green widely used on the Plains, Plateau and all other areas. This one tending toward blue but still green.

Y-1 A very beautiful and hard to find color in the original trade pigment. A bright and much sought after yellow in its day and even more so now. Used throughout the parfleche painting areas of North America.

Y-2 A beautiful darker yellow, seen on a lot of Nez Perce, Crow, Shoshone and other Plains both north and south and other Plateau and Rocky Mountain front tribes. Widely used back then, a scarce color today! A color found across the Plains and in all other areas, made with a scarce pigment.

Y-3 A natural earth yellow used throughout North America for parfleche/rawhide and brain tanned hide work.

R1 Back in the day a common red trade pigment, used all over North America, not so common today, and an expensive pigment.

R-2 A very nice earth red, used all over North America for parfleche/rawhide work and also hide painting and face/body painting. This red earth goes way back in antiquity. I have seen this color in a cache in Wisconsin that goes back before historic/proto-historic times.

R-3 Another earth red, a sort of brick red seen on a lot of parfleche, this one goes way back too.

E-1 This is the beginning of a series of brown/tan earth pigments that get lighter as we progress through them. This one E-1 is very dark and when seen on parfleche is mistaken with black from a distance. This one paints a nice deep brown.

E-2 A slightly lighter deep brown, seen on many parfleche.

E-3 A dark brown tending toward a reddish hue but not that discernable.

E-4 Close to number E-3 but a bit lighter and different in shade and tone, this one is seen used across the Plains and Plateau.

E-5 A nice medium brown tone found on parfleche from all areas especially the earlier plateau parfleche and flat cases. This tone and shade of brown is also seen on Cheyenne and other Plains Indian material.

E-6 A light brown tan, seen all over the Plains and Plateau.

E-7 A natural black that can be polished to a shine after application. The polished form is a rare black found on Blackfeet parfleche and flat cases. Care must be taken with this natural pigment because it will smear if not applied right and is the only one that will come off on your hands a bit without water. None the less it is a rare and useful cookie in that it can be used for doing exact replications of the rare parfleche that have the polished black on them. If applied when the hide is at optimum water content it is self sizing like the rest of our cookies.

R-4 This color is not in the spiral photo above nor the photo below. It is tagged in a photo below the keyed and priced photo below. Although orphaned in its own photograph that does not mean it is not a prominent color in the range of colors for parfleche painting. It is another very prominent trade red that was used throughout the parfleche making areas of North America. It is a few shades lighter then R-1. The reason it is not with the rest is that we were unable to locate the pigment until just a short time ago. So now you have it!

Parfleche Painting Cookies With Corresponding Code Numbers and Prices

For reference the first cookie B-1 is 1 5/8 inches in diameter. Because the pigment cookies are hand made the size will vary from 1 3/8 inches to 1 3/4 inches

Cookie R-4 a splendid red! Found on many pre 1900 parfleche cases

This color cookie was made from a scarce pigment that was hard to locate, but we were able to locate some!


Parfleche Painting Tips for Your Parfleche Painting Kit

In order to get the best results from the use of our parfleche/rawhide paint cookies please read these steps. Feel free to cut and paste these tips and add them to your parfleche making kit!

Preparing the rawhide for painting parfleche envelopes, flat bags, or cases

1 A fresh hide is the best! Soak it in water and then wet scrape it. You can wet scrape in the frame or on a beam. I like the beam. Or you can soak the hide in water then tie the hide in a frame, and flesh it with a scraper. For a salted hides let it soak in water to remove the salt. Change the water several times over a 24 to 48 hours period for complete salt removal if you are using a barrel (or maybe even the bathtub!). I found a pond, lake or pool in a river or stream works the best and there is no need to change the water. You need to keep an eye on the hide though, so you do not lose it to animals.

2 For the most authentic results leave the hair on at this point. All painting will be done on the flesh side of the hide, while the hide is wet/damp. (You can take the hair off and still end up with good results and it is much less work).

3 After the hide has been fleshed and is still wet tie it into a frame for painting. Tie the hide into the frame so it is tight but not so tight as to misshape the hide. You can use your scraper to help pull the majority of the water down and off of the hide after it is in the frame. You can also use the scraper at this point to tidy up the fleshing you did if need be.

4 Once you get the majority of the water out of the hide then it is time to stop everything and wait until the hide is at the proper point of hydration (water content). This can only be discerned by experience. The best way to test to see if the hide is ready is to try a cookie on the edge of the hide. If it leaves a distinct line and does not run or barely runs then the hide is ready to paint! Use your hands to feel the hide at this point so you can use “touch” in the future to discern if the hide is ready or not. Look at it closely too. Sight has a role to play in discerning the readiness of the hide for paint.

5 Now it is time to paint. Hopefully you have your design in mind, maybe a mental or physical template of the design. A straight edge if you are using it for outlines, which was done on some Shoshone, Crow, Nez Perce, Plateau and other parfleche designs. If the hide becomes to dry to paint on then you can mist it with some water and resume painting. Our experience with rawhide painting is that the best results are obtained on a hide that needs little or no misting. In other words, if you can finish painting the rawhide or parfleche completely before it becomes to dry to paint you will get superb results! The best time for painting is near evening when it is cool or in deep shade. Depending on conditions such as humidity, temperature, wind speed and direction, direct sun and other variables. We have found that you have one to four hours for painting.

6 After the hide is painted let it dry completely, cut it out and then pound the hair off. You can scrape the hair off before you paint, but we have found the best and most authentic results by pounding the hair off. Fold the parfleche, use weight to hold the folds for a few day.

Parfleche Painting Cookie Use

The rounded edge of the cookies can be uses to paint larger areas of color on a parfleche, rawhide envelope, rawhide bag or rawhide flat case. What we do is score and break a pie shaped piece out of the cookie. (see photo)Use a sharp knife or hacksaw blade to score the cookie. This pie shaped piece can be used for drawing lines. The line width can be adjusted by how you angle the tip of the pie shaped piece as you hold it between your fingers and touch the tip to the rawhide or parfleche being painted. Some tribes and/or individuals painted the outlines first other painted the large areas first and then added the outlines. You have to judge the speed and pressure at which you paint by the amount of pigment that ends up on the hide for the speed and the pressure you are using the cookie at. If you want more of an opaque look then more pressure and slower motion work well. A more transparent or translucent look then lighter pressure and slower movement work well.

Other Uses for Rawhide Painting Cookies

You can paint brain tanned hide, wood and other objects and material by lightly misting them with water and using a cookie to apply the pigment to the hide or other material. You can also use the cookies to apply pigment to a dry object or hide with bone or standard artist brushes by laying the cookie flat side up and adding a few drops of water with brush. Stir the water drops until on the cookie until you have the mix desired. Then you can take up the resulting pigmented water with either the bone brush or the artist brush and applying it to the object. Use a light touch on brain tanned hide. These methods can also be used on rawhide but the wet method described in the preceding paragraphs makes for better results on most parfleche or rawhide painting styles. A Japanese woman who uses our paint uses the cookies for traditional Japanese painting. So use your imagination. The uses for these high pigment cookies are endless!

Breaking the Cookie for the Purpose of Differing the Width of Lines and Width of Strokes

After scoring the cookie for a clean break take a pair of pliers in each hand and clamp down with them on each side of each score then force the break. This way you will end up with a cleaner break. You can always file or sand your pieces to the width or size you prefer. The small half moon size can be sanded at both tips for painting differing widths. The large half moon shape works very nicely to fill in large areas; if you use the rounded edge it will flatten with use and paint wider strokes as time goes on. Don't worry about using up the cookie quickly, the parfleche painting cookies last a long time. The wedge or pie shaped piece works nicely for the outlining work done on many parfleche bags and cases. The width of the narrow tip works great for this as is. The other end can be used for a much wider stroke. As you can see you have various profiles to work with out of the three pieces you get when you break the cookies this way. Light and heavy touch when using the cookie will result in various shades of the color used. Touch can also alter the opacity of the resulting painted area too.

First Attempt at Painting a Parfleche With Our Cookies Recipe, A Side by Side Comparison

The original 1870 era Nez Perce parfleche (isaptakay in Shahaptian) is on the left, the copy is on the right. This was a first attempt painted on a wet, wet scraped elk hide by a person who had never painted a parfleche before with or without paint cookies. The difference in shade and hue from the original is due to the age of the original and the eye of the begining painter when making the color choices for this initial effort.

You can have similar if not much better results!


Contact Information

Marie & Andrew Gussmann, PO Box 1995, Browning, MT 59417-1995
phone: 406-450-5876
mail: beadmatchbeads@gmail.com